 |
| 40 LED Lighting Circuit |
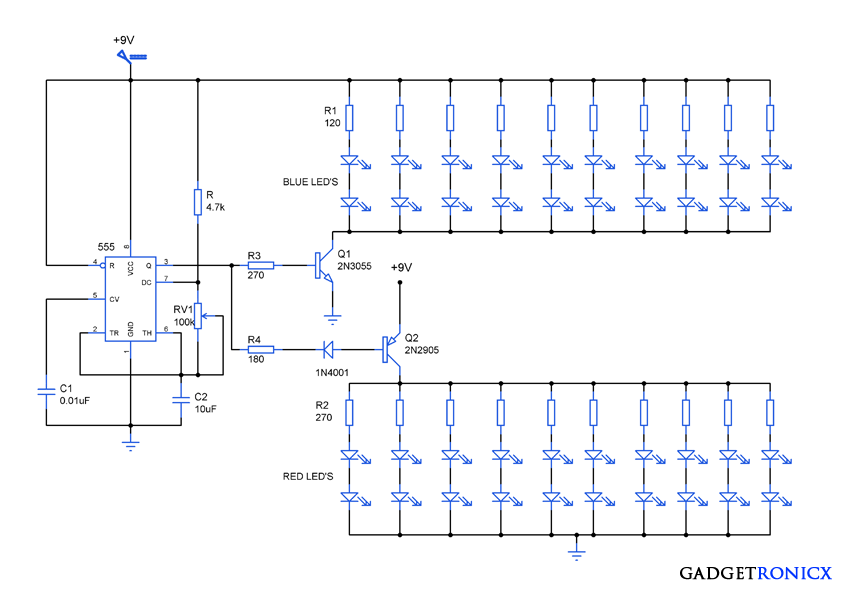
“LED’s”- every electronic hobbyist and engineers love to play with these to build attractive lightings with ease. LED’s have changed the way of lighting as it consumes less power than the primitive means of lighting used. In the above circuit 555 a timer IC was used along with LED’s to give a beautiful alternate switching effect. Connecting LED’s in different patterns will make it even attractive and that depends on your imagination. Lets move into the working of this LED lighting circuit diagram.
WORKING OF LED LIGHTING CIRCUIT DIAGRAM:
The working of the above circuit starts with IC 555 which was wired as a Astable Multivibrator which emits square wave as output. As we are familiar with working of Astable Multivibrator i dont need to give a large explanation for it. For those who are not familiar with its operation follow this link.
The output frequency of a 555 IC depends on the RC values R, RV1 and C2 altering these values will result in change in output frequency. This can be done with ease by changing the resistance value of variable resistor RV1.
The output of a 555 IC will be 1.7v less than the supplied voltage and also sources current of around 200mA. This current source is not sufficient to for 40 LED’s and this is where Transistor switches comes into play in this circuit.
A NPN transistor 2N3055 was used to turn on the Set I Blue LED’s whereas a PNP transistor 2N2905 was used to turn on the Set II of Red LED’s. NPN transistors switch on when positive V exceeding 0.7v is applied to the base terminal and also current enters the base. But in case of PNP transistors it will switch ON only when the base is connected to negative or ground and also current leaves the base here.
When the high or logic 1 signal is obtained from the 555 IC transistor Q1 2N3055 will be switched ON making the blue LED’s to glow. R3 is the base resistor for Q1 to limit the current flow. When the low or logic 0 is obtained from 555 transistor Q2 2N2905 will be switched on as the base terminal will be equal to zero potential. This makes the Red LED to glow and R4 functions to limit the current flow.
Summing up all the above, the high signal from 555 will make the Blue LED’s to glow while low signal will turn on the red ones. The continuous square wave output therefore gives a alternate lighting effect with the LED’s. A diode can be added in series to base of transistor Q2 to avoid switching when the signal is high.
Now the next section in this circuit is LED’s i have selected Blue for Set 1 and Red for set 2. The voltage consumed by a LED differ with their color so we must calculate the current limiting resistor separately for both set I and Set II. The forward voltage of a Blue LED is 3.0 – 3.5V ,for red color 2V and LED current ranges from 20mA to 30mA. We are going to take 3.5V for blue color LED’s and current value as 20mA.
The current flowing through a pair of LED’s will be same as 20mA while voltage will drop depending on the LED forward voltage. So to calculate current limiting resistor for Blue LED’s we must first calculate the total current consumed by Set I of LED’s.
Each pair of LED’s drop 3.5v so the total drop will be 7v. Substituting the current and drop values in ohms equation we get
R1 = Vcc – Vled / Iled = 9 – 7 / 20mA
R1 = 100 ohms
Choosing the nearest high rated resistor i have opted for 120 ohms. Similarly for red color LED’s 2v is the forward voltage and 20mA led current we get the resistor value R2 as 250 and we opt for high rated 270 high rated resistor.
You can use any LED’s in the circuit provided that the voltage and current source is sufficient enough to light it. And also you can obtain new lighting effect by altering the patterns in which the LED’s are connected in the above circuit.


