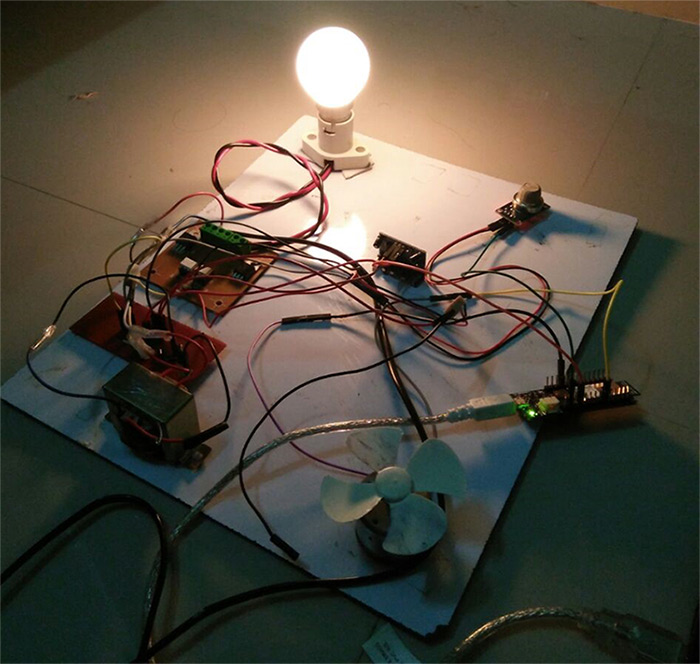
IOT has become huge trend in the last couple of years. With growing needs in connected devices many companies have shifted the attention to iot market. Today we are going to share a simple project which we have built – IOT based home automation and security systems using Arduino MKR1000. Hope you will like this project.
HARDWARE COMPONENTS USED:
- Arduino MKR 1000
- PIR Sensor
- Gas sensor
- Relay circuit
- Bulb
- AC motor
- Diodes(1n 4007)
SOFTWARE USED:
- Blynk App (Android/ iOS)
BLYNK APPLICATION:
Blynk is an IOT software platform which is available for both android and iOS. This platform is very much like a digital dashboard in which you can see all information from your connected devices. And the most of all Blynk supports many famous development boards like Raspberry Pi, Arduino, ESP8266 and other IOT platforms .
In our project this platform is used for following purposes
- Turn ON/OFF bulb and fan.
- Readings can be viewed from PIR and Gas sensor values.
- Monitoring of sensor values are made possible
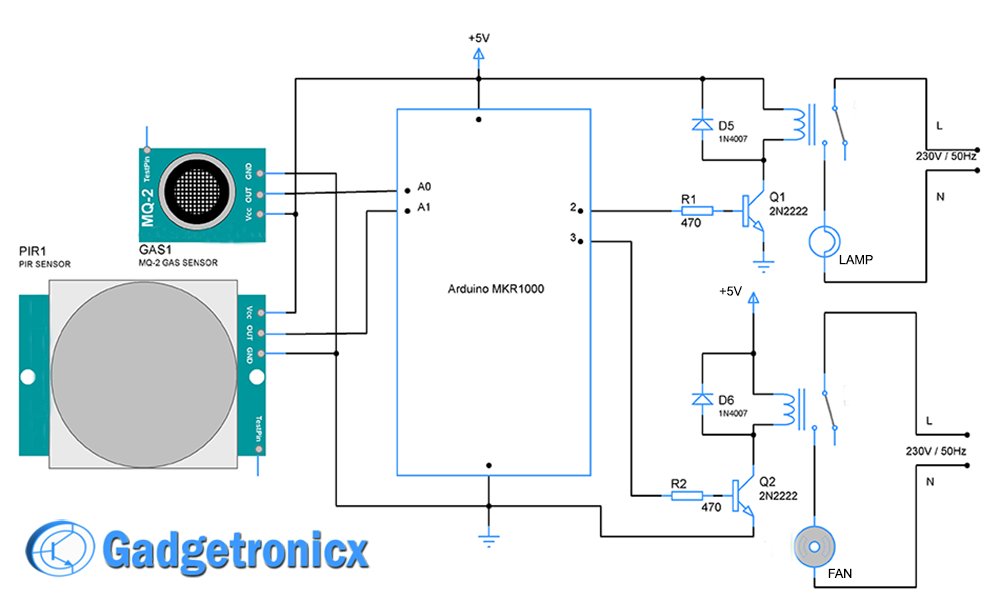
SCHEMATIC DIAGRAM OF HOME AUTOMATION SYSTEM:
EXPLANATION:
In this schematic PIR sensor and gas sensor is used to detect atmospheric conditions and the output from these sensors is fed into Arduino board. On the other hand lamp and fan is interfaced to microcontroller using couple of relays. The relay acts as an activator for both the fan and bulb. Transistor is added between relay and microcontroller pins to provide sufficient current. Lamp and Fan is connected to phase and neutral lines of AC power supply. This schematic is just for prototyping purpose of our home automation project, you can add devices to it with minor changes in the schematic.
PIR SENSOR:
This sensor is used to detect any motion or intrusion in a room. Placing at the entry door, this sensor is used as an intrusion detector in our project. This sensor outputs the intrusion in means of readings to microcontroller. This output value in turn will be displayed in the Blynk app of users smartphone.
GAS SENSOR:
This sensor is used to detect any gas leakages in our home. If any gas leakage occurs the elements in gas sensor will be ionized. The sensor module outputs voltage level depends upon the intensity of gas present. This is fed into the analog pins of Arduino as well. Then it will be display in the Blynk app.
MKR1000:
This is powerful Arduino board which is specifically built for the purpose of IOT. The board consists of in built WIFi controller making it a best solution for IOT prototyping by eliminating the necessasity of adding external hardware for WiFi connection.
USING BLYNK APP:
Blynk App will allow you to create your own server on its Blynk Cloud, through which the communication between your Arduino and Smartphone takes place. This is secure communication and user will be provided with Authorization key like other platforms. This UI provides buttons, sliders, timers and lot cool features. Also receiving notifications from Dev boards are other cool features of this platform. Refer these two links to get more idea about this.
TURN ON/OFF OF FAN AND LAMP:
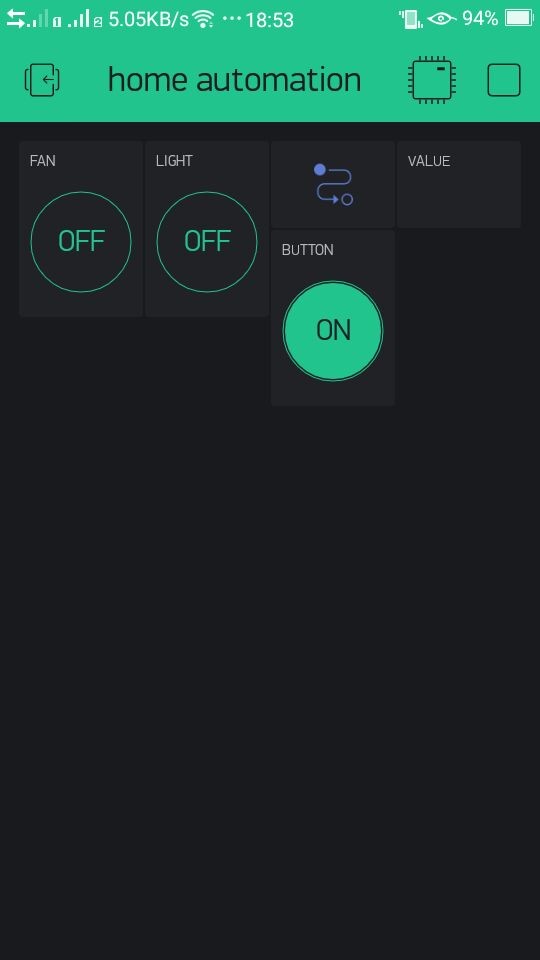
The above is the snapshot of UI i have developed for my project. I have added two toggle buttons separately for Fan and Light. With every on the respective buttons my Fan and Light will be turned ON/OFF. By this way i can use Arduino to control my home via a Smartphone with Blynk App.
CODE:
#define BLYNK_PRINT Serial    // Comment this out to disable prints and save space
#include <SPI.h>
#include <WiFi101.h>
#include <BlynkSimpleMKR1000.h>
unsigned int light=2;
unsigned int fan=3;
unsigned int gas=14;
unsigned int ir=16;
unsigned int irval=0;
unsigned int gasval=0;
unsigned int ir_val;
unsigned int gas_val;
unsigned int gasvalue=0;//to intiale gas sensor value to zero to avoid garbage value
unsigned int irvalue=0;//to intiale ir sensor value to zero to avoid garbage value

// You should get Auth Token in the Blynk App.
// Go to the Project Settings (nut icon).

char auth[] = "Your Auth Token Goes here";

// Your WiFi credentials.
// Set password to "" for open networks.

char ssid[] = "Your SSID";
char pass[] = "Your WiFi password";

void setup()
{
  Serial.begin(9600);
  Blynk.begin(auth, ssid, pass);
  // Or specify server using one of those commands:
  Blynk.begin(auth, ssid, pass, "blynk-cloud.com", 8442);
//Blynk.begin(auth, ssid, pass, server_ip, port);

  pinMode(gas,INPUT);
  pinMode(ir,INPUT);
}
void door()
{
  irval=analogRead(ir);
  ir_val=map(irval,0,1024,0,255);
  if (ir_val >100)
  {
    Serial.println("the ir value is::");
    Serial.print(ir_val);
    Blynk.virtualWrite(V0, ir_val);
    delay(2000);
  }
}
void gas_1()
{
   gasval=analogRead(gas);
  gas_val=map(gasval,0,1024,0,255);
   if(gas_val > 100)
   {
    Serial.println("the gas value is::");
    Serial.print(gas_val);
    Blynk.virtualWrite(V1, gas_val);
    delay(2000);
   }
}
void loop()
{
  door();
  gas_1();
  Blynk.run();
}
NOTE:
- You can improve this home automation project by going extra mile and customize code that could pop notifications in your app when Sensor value goes out of Range.
- Also you could connect many devices together using Blynk and hopefully this project will give a head start on automating your whole house (Try not to burn it to ground though)
MAKERS:
- N.Gopala Krishna Reddy
- D.Karnakar
- A.Laxmi Prasad






hi sir
Hi Susmitha, How may I help you
can i use audrino uno
and is there any library required
Yes you need an library for this . You can download it here https://github.com/blynkkk/blynk-library/releases/tag/v0.4.8