 |
| Design of LCD and Keypad Interface to PIC Mircocontroller |
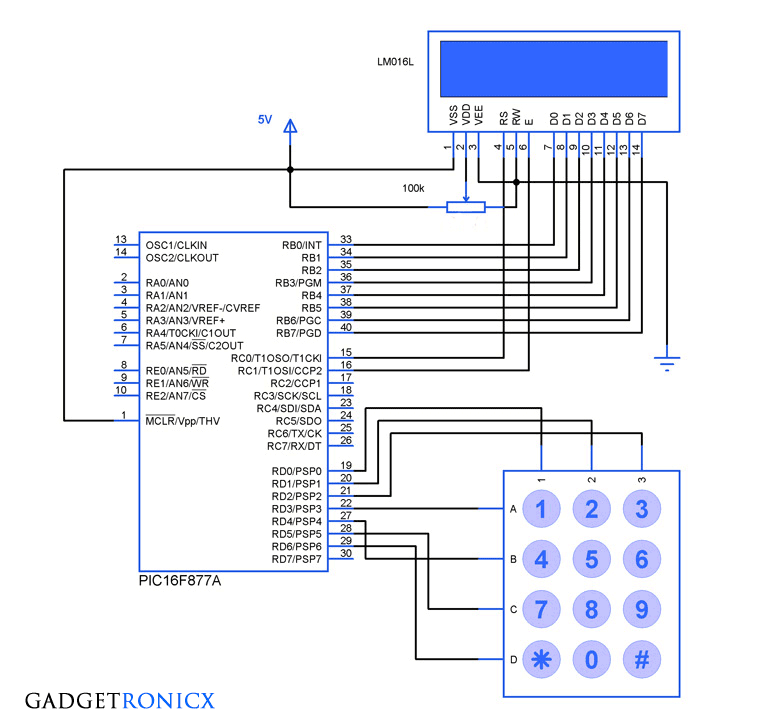
Interfacing LCD and Keypad are one of the important interfacing concepts of PIC microcontroller since both the input and output element can form a complete embedded system design. This tutorial is about teaching you how to get input input values from keypad by polling method and display the input into a 16×2 LCD.
16×2 LCD:
This type of LCD is widely used to display the status of the system and to display the obtain output. This LCD consists of 16 columns and 2 rows, therefore named as 16×2 LCD. Usually a LCD consists of two built in registers known as Data and Command register. Command reg is meant for giving commands such as blink on, cursor on/off etc while Data reg is to display the input character.
You have to follow these steps to write a command or data into the LCD.
- Place the Data/Command in the pins D0-D7 of the LCD.
- If you are intended to write command you gotta make the RS(register select) pin of the LCD low, that is RS=0
- Whereas for writing data you have to make this RS high, that is RS=1
- Then the EN of the LCD must undergo a high to low logic transition with some delay in between them, that is EN=1 to EN=0 with specific delay.
- The R/W pin should remain in the Logic 0.
Usually LCD’s have some preassigned commands that would do specific tasks in functioning of the LCD. The command table of a 16×2 LCD is given below.
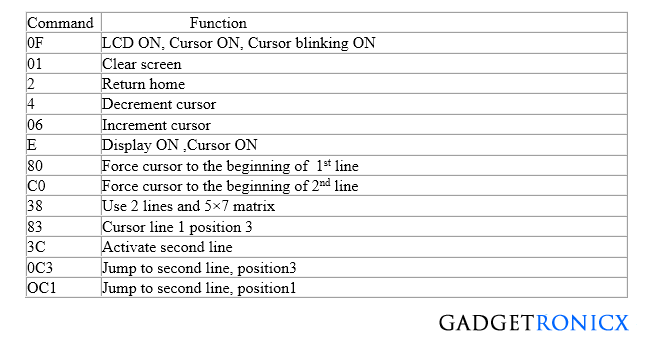 |
| Command Table for 16×2 LCD |
Still not clear about the working of LCD? I suggest you to go through this Tutorial on LCD interface
4×3 Keypad:
We have used a 4×3 keypad which means it has four rows and three columns in it. The keypad was scanned for any key inputs and this was done by means of a method called polling. The scanning takes place by keeping a specific Row low at a time and read the status of the column pins as input at that instant. This chain goes on through all the rows and by this way input is read by Microcontroller.
Read how to constuct keypad and how the scanning works in this Tutorial of Keypad Interface and scanning.
CODE:
The below code was built by using CCS C Compiler for PIC Microcontrollers.
#include <keypad.h>
#bit C1=0x08.0     //Assigning Columns of Keypad to PORT D
#bit C2=0x08.1
#bit C3=0x08.2
#bit R1=0x08.3    //Assigning the rows of Keypad to PORT D
#bit R2=0x08.4
#bit R3=0x08.5
#bit R4=0x08.6
#bit TRIS_C1=0x88.0                //Setting the TRIS  pins of PORT D
#bit TRIS_C2=0x88.1
#bit TRIS_C3=0x88.2
#bit TRIS_R1=0x88.3
#bit TRIS_R2=0x88.4
#bit TRIS_R3=0x88.5
#bit TRIS_R4=0x88.6
#byte lcd=0x06                        //Assigning LCD to the PORT B
#byte TRIS_lcd=0x86
#bit rs=0x07.0
#bit en=0x07.1
#bit TRIS_rs=0x87.0             //Assigning RS pin to PORT C.0
#bit TRIS_en=0x87.1            //Assigning EN pin to PORT C.1
void lcd_msg(char b,int c);
char keypad();
char a;
void main()
{
TRIS_R1=TRIS_R2=TRIS_R3=TRIS_R4=0;  //Directions to row and col
TRIS_C1=TRIS_C2=TRIS_C3=1;
TRIS_lcd=TRIS_rs=TRIS_en=0;
lcd_msg(0x38,0);                                     //lcd_msg function calling for data/command to lcd
lcd_msg(0x80,0);
lcd_msg(0x0f,0);
   while(TRUE)
   {
     a=keypad();                                      //Taking keypad input to a char variable
     lcd_msg(a,1);
   }

}
char keypad()
{
while(TRUE)
{
     R1=1;                                           //Scanning Process
     R2=R3=R4=0;
     if(C1==1)
     {
     while(C1==1);
     return '1';
     }
     if(C2==1)
     {
     while(C2==1);
     return '2';
     }
     if(C3==1)
     {
     while(C3==1);
     return '3';
     }
     R2=1;
     R1=R3=R4=0;
     if(C1==1)
     {
     while(C1==1);
     return '4';
     }
     if(C2==1)
     {
     while(C2==1);
     return '5';
     }
     if(C3==1)
     {
     while(C3==1);
     return '6';
     }
     R3=1;
     R1=R2=R4=0;
     if(C1==1)
     {
     while(C1==1);
     return '7';
     }
     if(C2==1)
     {
     while(C2==1);
     return '8';
     }
     if(C3==1)
     {
     while(C3==1);
     return '9';
     }
     R4=1;
     R1=R2=R3=0;
     if(C1==1)
     {
     while(C1==1);
     return '*';
     }
     if(C2==1)
     {
     while(C2==1);
     return '0';
     }
     if(C3==1)
     {
     while(C3==1);
     return '#';
     }
}
}
void lcd_msg(char b,int c)                  //LCD command/data sending function
{
lcd=b;
rs=c;
en=1;
delay_ms(20);                                 //calling out delay of 20msec
en=0;
delay_ms(20);
}
The code comprises of Two subroutines – “lcd_msg()” is for writing data/command to the LCD where keypad() is to scan the keys of the keypad. In the “lcd_msg()” function the command/data value is directly passed to the function while calling by means of “char b” and RS value by using “int c” , 0 implies for command and 1 for data
.

HI FRANK
I’m looking for a “MikroC pro for pic” program to fix my personnel safe. that means replace the whole controle PWB and the microcontroller on it, rebuild a new systeme to open the safe.
in fact the exemples I find on the WEB are not matching my request and some of them are not useful at all
I do find this Idea a great one because never in the past I thought about it so I began learning about microcontrollers and programmation languages… OK I’m sorry it’s an endless story but I need help
RABAH from Algiers, Algeria
Hi Rabah,
Thanks for visiting.
I couldn’t really figure out your query from the above. What help you exactly need please ?
hallo pls hex file compler
Sorry Imed, this article is quite old in our site and I couldn’t fine the hex file for it.